
Road to Perfection: Stay out of the Middle
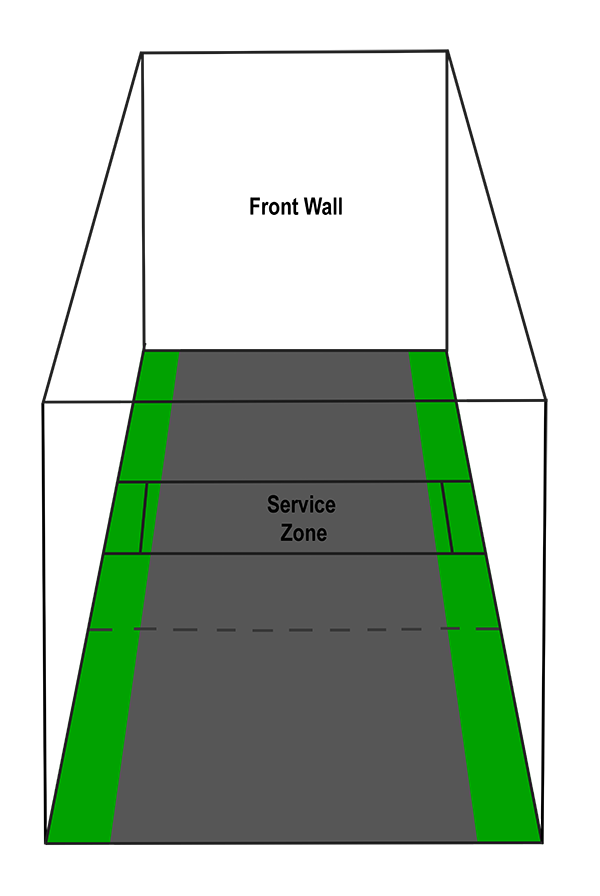
| Avoid the shaded gray area in the middle portion of the court when you’re hitting straight-line, front-to-back shots. Use the green side corridors to get the most effectiveness out of your straight-line, front-to-back shots. |
By Mike Dau
Handball Coach
Lake Forest College
Some years back, a great player shared with me his thoughts about playing a perfect game. To accomplish this nearly impossible task, he said that all his straight-line, front-to-back shots would run down the walls and all his other shots would contact at least one side wall.
It certainly sounded simple enough, but with my limited knowledge of the game, I needed an explanation in greater depth.
“Avoid hitting straight-line shots in the area between the doubles boxes,” he said. “In other words, keep them out of the middle of the court, and execute angle shots when you cannot control the ball down the walls.”
If you can visualize a narrow corridor the width of the doubles box on both sides of the court, this is the area for hitting straight-line, front-to-back shots (see the diagram). These would include serves, kills, passes and ceiling shots. Creating difficult situations for an opponent is basic strategy in any match. This objective is better achieved the closer the ball runs down a wall.
When a rally situation makes it difficult to execute a straight-line shot down a wall, then a cross-court angle shot is the best option. Using the side walls correctly can either end a rally or dictate a defensive return by your opponent.
The diagrams below are defensive shots executed from the back quarter of the court taken off the back wall or a ground stroke off the floor.
Diagram A: Illustrates a shot taken near the right side wall that requires the use of the right hand. The ball should be directed to the front wall, left of center, 4 to 6 feet high, with power and at an angle that allows the ball to contact the side wall near the short line.
Diagram B: Illustrates a shot taken near the left side wall that requires the use of the left hand. It is the same shot shown in Diagram A, except that the ball is directed to the right of center.
Diagram C: Illustrates a shot taken near the middle of the court. From this position the ball can be directed into two walls, right or left. The principles in Diagrams A and B can be applied, although the angle must be adjusted.
Diagram D: Illustrates a three-wall option to Diagram C. The ball directed side-front-side has to be hit hard and should contact the initial side wall 8 to 12 feet high. Hitting the ball higher might result in the ball rebounding back into the front court and providing the opponent with an offensive opportunity. Generally, a right-handed player from this deep mid-court position would drive the ball into the right side wall, and a left-handed player would drive the ball into the left side wall.
Diagram E: Illustrates a three-wall shot taken by a right-handed player 3 to 4 feet from the left wall, enough space to allow hitting the ball with the right hand. A left-handed player could hit the same type of shot, with the left hand, 3 to 4 feet from the right wall, directing it into the left side wall.
 |
 |
 |
 |
 |
To elevate your game to another level, consistency in cross-court shots must be achieved. There is no solution other than practice, and you can start by standing in the back quarter of the court, dropping the ball as you would when serving and trying to execute the angle shots as described. The next step would be to lag the ball into the front wall, forcing you to take a ground stroke in the back quarter, each time in different floor positions. Then try back-wall shots from the back quarter, again moving the location, forcing different angles.
Over the years in teaching seminars, I have used the catchphrase “High diddle, diddle, keep the ball out of the middle.” Easy to say, not so easy to do unless you work at it.